Tree Trimming 101
Whether you’re planning to prune your trees yourself, or hiring a local tree service and you want to learn the basics. This step by step guide will cover everything you need to know to be able to safely begin trimming your trees.
Tree trimming step by step guide:
Step 1: Check for hazards
How to avoid harm to you and your tree while trimming
Although we are providing these basic tree pruning instructions, we recommend contacting an ISA Certified Arborist for anything more than basic tree care. Pruning trees incorrectly can not only damage your trees, but also result in injuries or death for untrained individuals. An arborist is a specialist in the care of individual trees. ISA Certified Arborists are knowledgeable about the needs of trees and are trained and equipped to provide proper care.
- The tree cannot be pruned from the ground (requires ladders or climbing).
- The tree has been identified as hazardous (disease, fungus, infestation).
- The tree is near electrical or other utility lines.
- The branch(es) that need to be pruned are large (12”+ diameter).
- Keep pruning equipment sharp, clean, and in good operating condition.
- Make clean cuts.
- Be careful with all tools.
- When pruning trees that show evidence of disease, disinfect pruning equipment between trees (Lysol works fine).
- Always wear personal protective safety equipment, including safety glasses, while pruning.
Step 2: Decide why you want to prune
That’s where pruning comes in! While you may have heard the term and know it has something to do with trimming your trees, read on to learn exactly what pruning is, why you should prune, and how to prune. Pruning is the deliberate removal of tree branches and limbs to achieve a specific objective in the alteration of a tree’s health and form. It’s the most significant tree maintenance practice due to costs and impact on the tree, but can extend the useful life of your tree by decades.
- Remove dead or hazardous branches
- Maintain vehicular, pedestrian, and sight clearance
- Improve the tree structure, e.g. balancing crown weight to avoid future leaning
- Increase light or air penetration
- Improve tree aesthetics
Step 3: Evaluate your tree
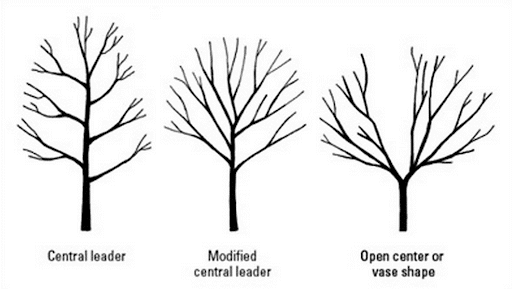
Other things to look out for:
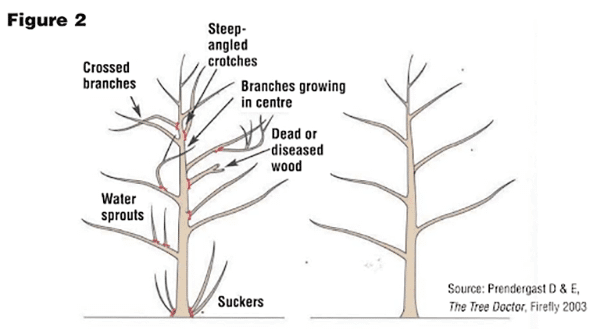
- Check for suckers (vigorous shoots that develop near the ground) and for water sprouts (vigorous shoots that grow on trunks or side branches) it is best to remove these to direct energy into upper canopy growth.
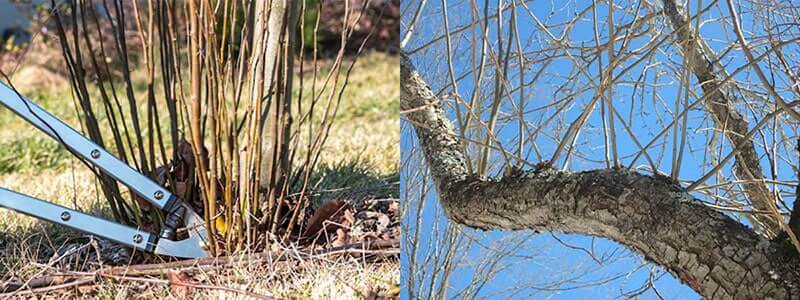
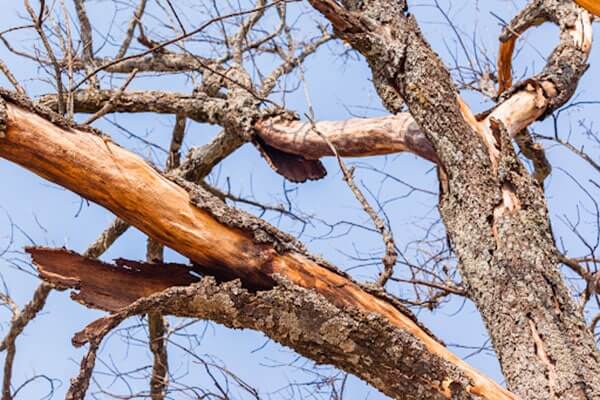
- Are there any dead limbs in the tree? Dead limbs attract insects and provide opportunities for diseases to develop.
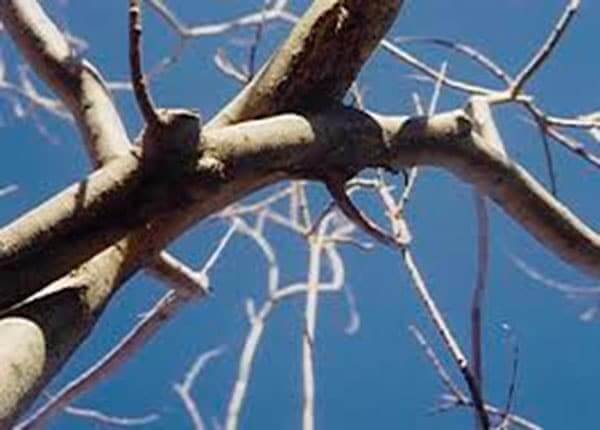
- Can you spot any crossing branches? These can rub together and open wounds on the tree that invite problems later on, even oak wilt.
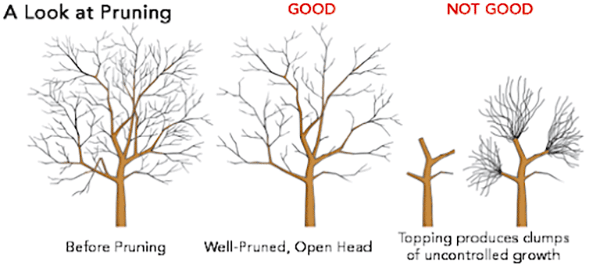
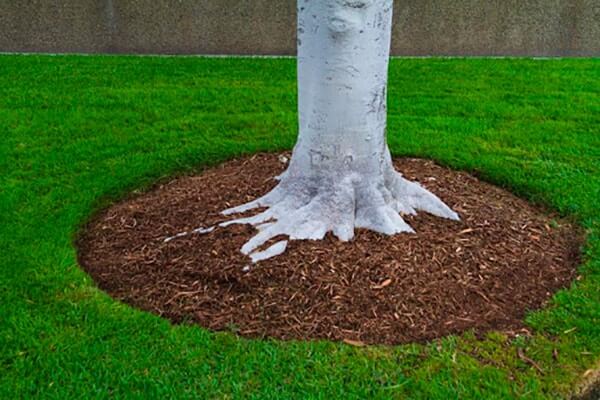
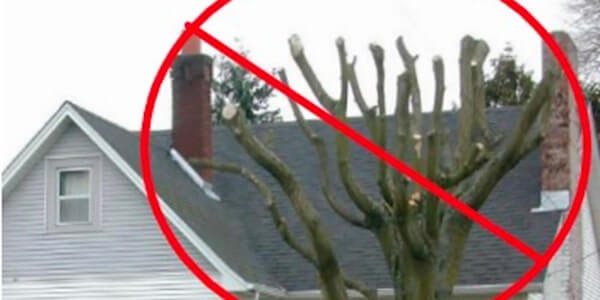
- Topping: The reduction of a tree’s size using heading cuts that shorten limbs or branches back to a predetermined crown limit. (cutting a trees canopy in half arbitrarily)
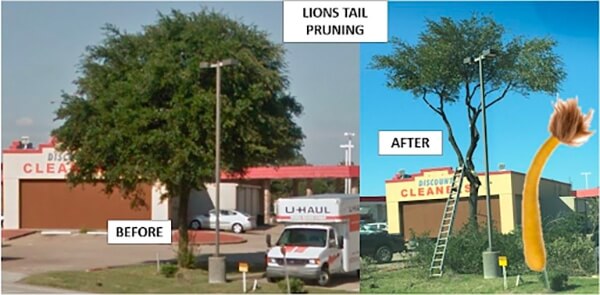
- Lion’s Tailing: The removal of an excessive number of inner, lateral branches from parent branches. Also known as lollipopping.
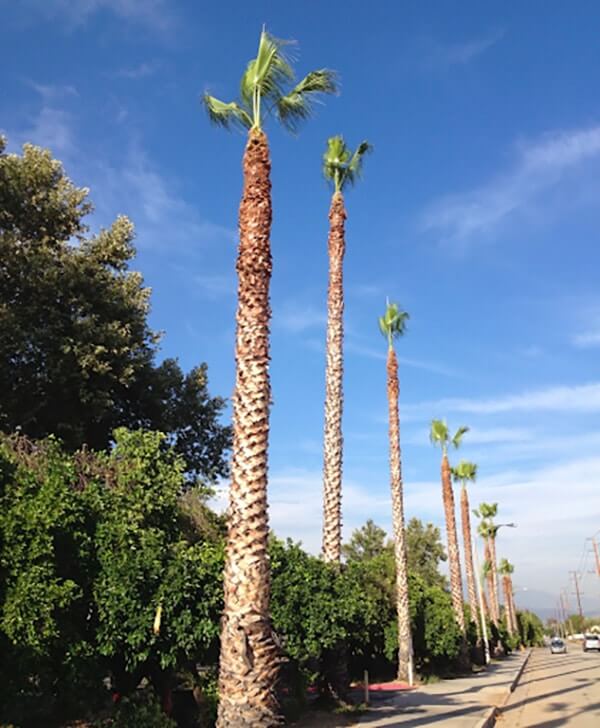
- Rooster-Tailing: The over-thinning of palms, usually by removing too many lower, live fronds.
Step 4: Decide when to prune your trees
Your reason for pruning impacts when you should prune, so think back to your reasons from step 2. Routine maintenance pruning of dead or dying branches can be done at any time, but if you have other goals then you’ll need to plan your trimming around the seasons.
For new trees, inspect for pruning needs annually. Prune trees regularly throughout their life to keep them healthy, safe, and aesthetically pleasing.
Do not defer pruning until limbs get large. Large limbs equal large wounds, which are more difficult for a tree to seal and leave the tree open to disease, insects, and rot. Do not prune trees on a crisis-only basis. Do not attempt to reduce tree size as a substitute for proper tree selection and placement. Known as topping, this is incredibly damaging to trees.
Here in Austin, Texas some of the most common tree species I see are Oaks, Elms, Cedars, Crepe Myrtles, Bradford Pear, Hackberry, and Fruit Trees.
- The best time to trim oak trees in Austin Texas is in the fall and winter.
- It is critical to avoid trimming during oak wilt season (February-July) if at all possible.
- Live oaks typically do a leaf exchange in late winter so it is better to trim them in late fall or early winter.
- Removing Dead and broken branches can be done at any time.
- Elms are hardy and native to Texas. They are typically the first to get their leaves and the first to lose their leaves.
- Trimming elms in the fall and in the winter is best to avoid sap leaking.
- Elms are prone to rot where large pruning cuts are made.
- We can trim our elms year round since Austin Texas is not an area where Dutch Elm Disease is present.
- Cedars are native and common throughout central Texas. This tree often forms extensive low forests or dense “cedar breaks” on the limestone hills and slopes of the Austin Hill Country and the Edwards Plateau.
- Considered an invasive weed species over much of its range.
- In Texas we generally trim cedars any time of year but if you want to prune at the optimal time for this species June and July is your best bet
- Crepe Myrtles produce flowers on each year’s new growth.
- Trimming in the fall leads to more blossoms in the spring.
- Trimming in the late spring will reduce the number of flowers the following year.
- For the health of the crape myrtle, the best time to trim is winter.
- YOU SHOULD NEVER TOP CREPE MYRTLES. Protect Austin’s Crepe Myrtles by reading our last post about this topic. Topping destroys the trees natural beauty and leaves it vulnerable to infestation and disease.
Bradford Pears:
- You can safely trim Bradford pears at any time.
- Proper structural pruning when needed is very important for Bradford pears because their natural growth patterns often lead to weakness at branch joints.
- Hackberries are generally considered a “trash tree” by most Texas homeowners because their wood is weak and prone to breaking especially during high stormwinds.
- If you have hackberries in your yard that you’d like to keep, it is critical that you keep the tree well pruned to make the tree as strong as it can be.
- Hackberry trees are fast growers, able to put 2 feet of height on each year
- It is best to prune during the winter months but with these trees you can really trim any time of year in Texas.
- Structural pruning for fruit trees should be done in the winter.
- Trimming for fruit production should be done just after bloom in early spring.
Step 5: Identify the skeleton of the tree
Step 6: Use proper pruning technique
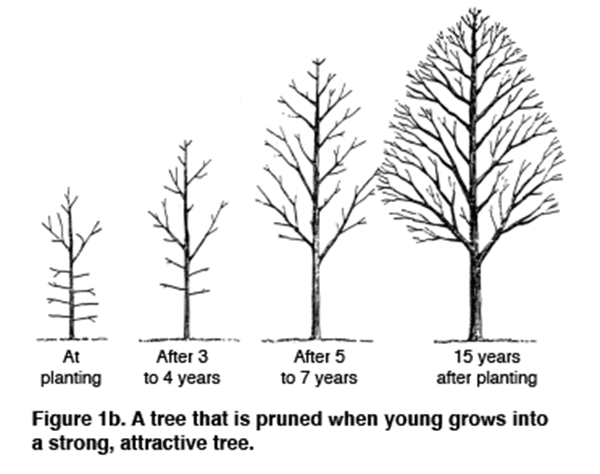
Tree-Training
Correct pruning of young trees will improve structural stability, increase tree longevity, and decrease maintenance costs. Trained trees will have fewer branches but better spacing. With fewer structural defects when mature, trained trees reduce the need for costly corrective measures later.
The process of training young trees directs growth to fulfill the landscape function, reduces structural defects that may lead to tree failure, and ultimately decreases hazard potential and liability risks. Well-maintained trees are an asset to any landscape.

Proper Pruning Technique
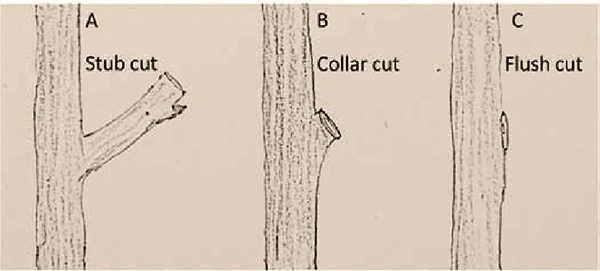
Every branch has a swell at the base, where it meets the trunk of the tree. This is known as the branch collar. You need to make pruning cuts further away from the trunk than the collar.
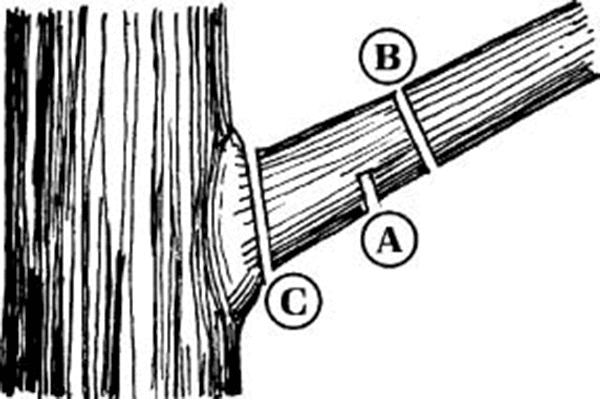
The three-cut pruning method.
- Make a shallow cut on the underside of the branch, away from the collar. This will prevent bark tears if the branch drops suddenly.
- Just beyond the partial cut, cut through the branch to remove the bulk of the weight.
- Finish the prune by cutting through the branch just outside the branch collar.
The two most common pruning errors are known as “flush cuts” and “stub cuts.” Both of these errors happen during Cut 3. A flush cut is a cut that injures or removes the branch collar. A stub cut leaves too much branch past the collar. Stub and flush cuts can open your tree to pests, disease, and decay.
Pruning is much more than the simple act of sawing off limbs. Proper pruning is an art based on scientific principles of plant physiology. At its most basic level, pruning trees involves removing damaged, dead or structurally weak limbs, which will improve a tree’s health and reduce the chances of personal or property damage caused by falling limbs. More advanced pruning methods aid in improving the tree’s structure and long-term health.
Arborists adhering to proper pruning standard will not:
- Leave branch stubs
- Make unnecessary heading cuts
- Cut off the branch collar (not make a flush cut)
- Top or lion’s tail trees (stripping a branch from the inside leaving foliage just at the ends)
- Remove more than 25 percent of the foliage of a single branch
- Remove more than 25 percent of the total tree foliage in a single year
- Damage other parts of the tree during pruning
- Use wound paint
- Prune without a good reason
- Climb the tree with climbing spikes
Step 7: Remove dead, damaged or diseased branches
A dead branch is a branch where all the cells have died and it will not come back. It is not dormant, although it can look like dormant branches on the tree in winter. The dead branch will not produce leaves or buds in the spring and can sometimes start to grow fungi. On the other hand, the wood tissue within a dormant branch is completely alive, waiting for a chemical signal to start working again.
When the wood of trees and shrubs die, there are a few, often subtle signs:
- The presence or absence of leaves out of season
- A lack of buds at the nodes
- Hollow wood and missing bark
- Fungus or mushrooms growing out of the wood.
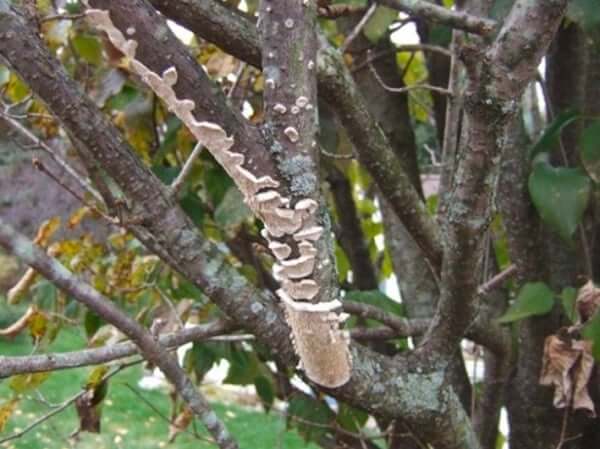
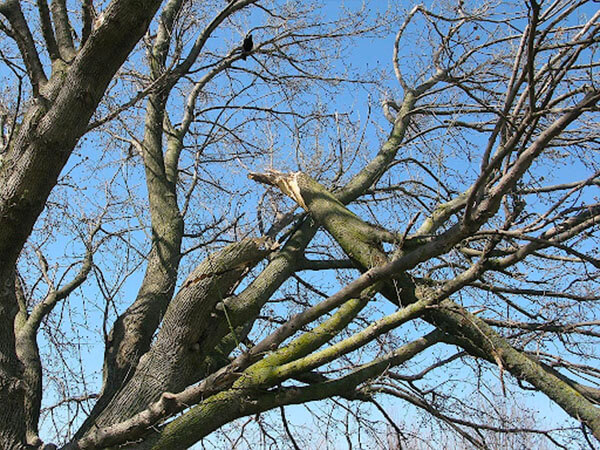
With damaged wood the entire branch or limb is not dead. In some cases the branch will still have foliage and be functioning well. However this damage will cause weakness and trouble down the road.
One common example is an impact to a tree that penetrates the bark, such as from a vehicle collision or a mower or string trimmer. This creates a dead zone that the plant will try to heal over time. If the damage is deep, healing cannot cover it completely.
A stem that has been bent too far can permanently crease the wood or snap it completely. A crease interrupts sap flow and the plant is likely to die back to the bend over time.
Whenever damage is beyond minor, it’s best to remove the hurt branch to let a stronger one take its place.

Diseased Wood
Unlike wood that is simply dead or broken, diseased wood contains a living inoculant that can still spread and re-infect the living plant even after you cut it off. These may be insect eggs in the wood, fungus spores or bacteria that can leap through the air riding splashes of rain onto a new plant.
For these reasons, it is not enough to just cut off diseased wood—you must remove it from the site as trash or destroy it by burning. You should also disinfect tools that cut into diseased wood before using them to cut again into good wood.
As oak trees grow their root systems are mostly lateral as opposed to being deep, which means that the roots can extend many times further than their canopy with only a few horizontal roots adding structural stability. The reason for this is that the tree needs to keep its roots in less compacted, oxygenated soil for its feeder roots to be able to do their job. This also means that all the oaks in your yard, and sometimes entire neighborhoods, probably have interconnected systems that have grafted together. Since oak wilt can spread through root systems, one tree gets sick and it can quickly spread to many others.
